Connect Google WiFi to Existing Router: Step By Step Process
Google Nest WiFi router is a well-known technology that works to provide fast internet service to your phones, computers, and laptops. Google Nest WiFi is easy to install in your house. If you want to link it with your existing home network router, then it would be an upgrade to your home network.
This blog will be get you every bit of information about setting up Google Nest WiFi and connecting it to your home router. You will go through the full process of the Google WiFi router setup and how to connect Google WiFi to existing router. So, let’s start this informative blog right away.
How to Connect Google WiFi to Existing Router?
Google WiFi router is a networking device that can connect to the other routers and modems. But, Google mesh WiFi routers didn’t support other brand’s router and modems like Netgear, Linksys or ASUS.
Now, let’s connect Your Google router to home network router and then we will explain how to complete its setup with simple steps.
Place Google WiFi Close to Router
- To link your existing router to the new Google WiFi router, you must place it close to the home router.
- Then, take out all the accessories that come with the Google router like Ethernet cable, power cord and adaptor, and user manual.
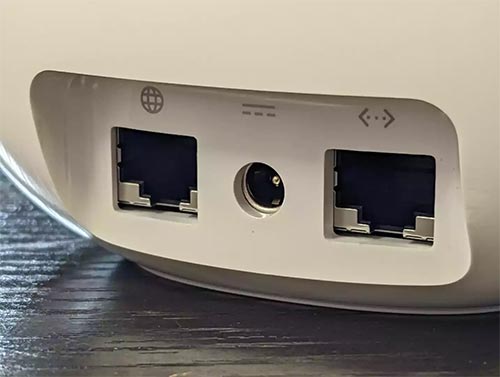
Locate WAN And LAN Ports
- Now, find the WAN port of the Google Nest WiFi router and LAN port of the Home network WiFi router.
- You should make sure that you have located the right ports because this is correct port connection pattern, which link both the devices.
Connect with Ethernet Cable
- Insert the network cable to the WAN and LAN port and that you have located.
- Carefully, insert the cable and then connect electric cord to the Nest router power port. Insert the adaptor to the wall socket.
Turn Connected Network On
After connecting all the cables correctly, you have to turn it on by pressing the power button that is given on the front.
If you have any other Google mesh WiFi router that you can use to boost WiFi signal through walls, but it will only connect to the Nest device.
Now, have a look on some troubleshooting tips that you should apply to make a secure connection between both of the network devices.
Some Troubleshooting Tips
- You must choose an optimal location or spot for your Google Nest router, which should be close to the existing router.
- The Nest device spot must be far away from the electronic devices like microwave ovens.
- Ethernet cable should be in good condition, make sure it is not damaged or cut.
- Use good condition electric wall socket to supply the power to the Google WiFi router.
After applying all the tips and connecting Nest router and home router, you should complete the Google WiFi router setup by adjusting its settings.
How to Complete Google Nest WiFi Router Setup?
Google router provide a simple to use and easy to access web interface, which help users to adjust its settings and networks. Just follow some steps to log in to the Nest WiFi interface.
- To login, you can use computer, laptop even your phone. But, it is advisable that, you should access the interface by computer.
- Just link your computer to the Google nest and start it, open a web browser in it.
- Now, search its assigned IP address like 192.168.1.1, which should be given in the user manual or on the label of the router.
- After searching the login IP address, you will see a login page of the interface, where you have to type in User details (username and password). The click the NEXT button.
- You will enter in to the interface, where you have to adjust some settings, so that the home router and Google WiFi can link to each other.
End Paragraph
Here are the end lines of this blog in which you have learned how to connect Google WiFi to existing router. We have explained further about the Google Nest router setup. Hope, you have read out the entire blog and successfully installed your new Nest WiFi router in your home.